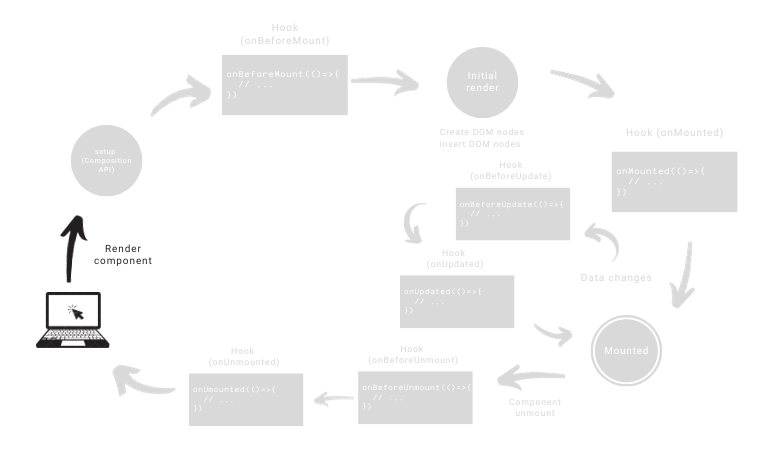
Vue 3, with its Composition API, brings a new and improved way to handle the lifecycle of components. Understanding the Vue 3 lifecycle is crucial for developers seeking to harness the full potential of this frontend framework. Let’s take a journey through the Vue 3 lifecycle using the Composition API, exploring the key stages and components involved.
In Vue 3, the lifecycle of a component begins when it is created and ends when it is destroyed. The process involves various stages, each serving a specific purpose in managing the component’s behavior. Let’s delve into these stages to gain a comprehensive understanding.
The process starts with the render of a Vue component.
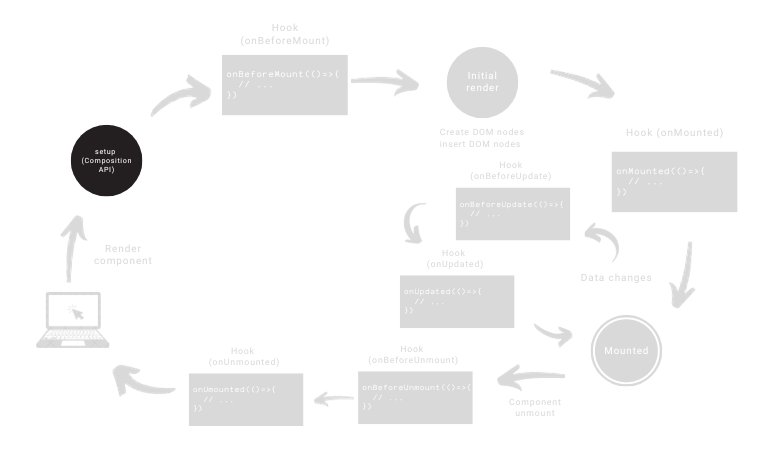
When a component is instantiated, the setup() function, a fundamental part of the Composition API, is called. This function is where you define and organize the component’s properties, methods, and other reactive data.
<script>
import { ref } from 'vue'

export default {
  setup() {
    "ref" is used to create a reactive variable
    const count = ref(0)

    // expose to template and other options API hooks
    return {
      count
    }
  },

  mounted() {
    console.log(this.count) // 0
  }
}
</script>
Vue 3 hooks lifecycle: setup
However if you are using Composition API with Single-File Components, <script setup> is strongly recommended for a more succinct and ergonomic syntax, and this is the syntax we will be following throughout this post.
<script setup>
  import { ref, onMounted } from 'vue'

  const count = ref(0)

  onMounted(() => {
    console.log(this.count) // 0
  })
</script>
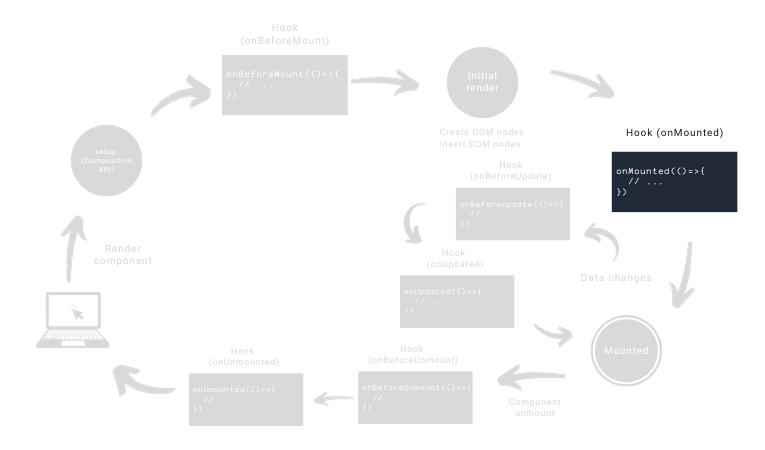
Vue introduces the concept of lifecycle hooks, which allows developers to execute code at different stages of a component’s lifecycle, these are specialized methods strategically positioned to run code at different points in a component’s journey.
They’re like checkpoints that let developers execute actions or set up logic at precise moments, such as when a component is born, attached to the DOM, updated, or bids farewell. These hooks offer a structured and effective approach to managing a component’s behavior throughout its lifecycle. They’re the tools developers use to seamlessly weave in functionality, ensuring their Vue components operate smoothly from creation to destruction.
onBeforeMount()Let’s begin with our first hook, onBeforeMount(), this hook is called synchronously immediately after the instance has been created but before data observation and event/watcher setup. Useful for configurations that need to be in place before the component is fully initialized.
onBeforeMount(() => {
  // Logic to execute before the component is mounted
});
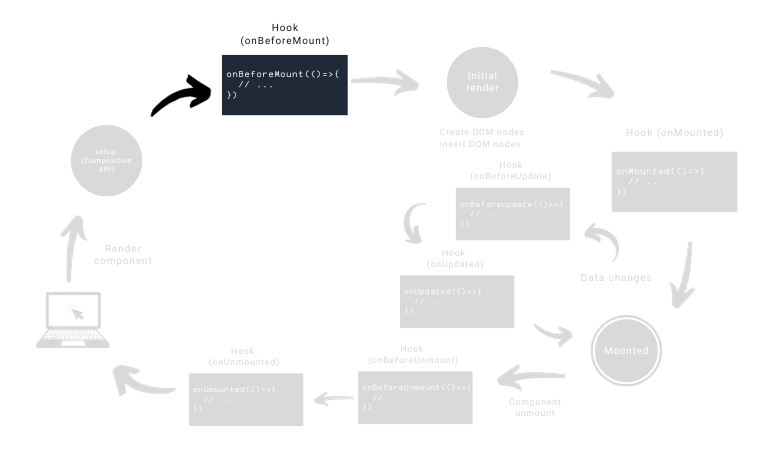
onBeforeMount hook include:Keep in mind that modifications to the component’s reactive state within the onBeforeMount hook will be reflected in the initial render. If you need to perform tasks after the component is mounted, you might want to use our next hook instead.
The initial render process in Vue 3, facilitated by the setup syntax, represents a streamlined approach that combines various aspects of component definition. To provide some context for readers who may be less familiar with these terms, let’s briefly explore the key concepts involved: compilation, reactive state creation, virtual DOM, and automatic mounting.
Here’s how the initial render process works with the setup syntax:
setup block.setup block, such as count, become reactive. This means changes to these variables trigger reactivity in the component.script setup syntax, you don’t need a separate mounted hook. Code after the setup block is automatically executed after the component is mounted.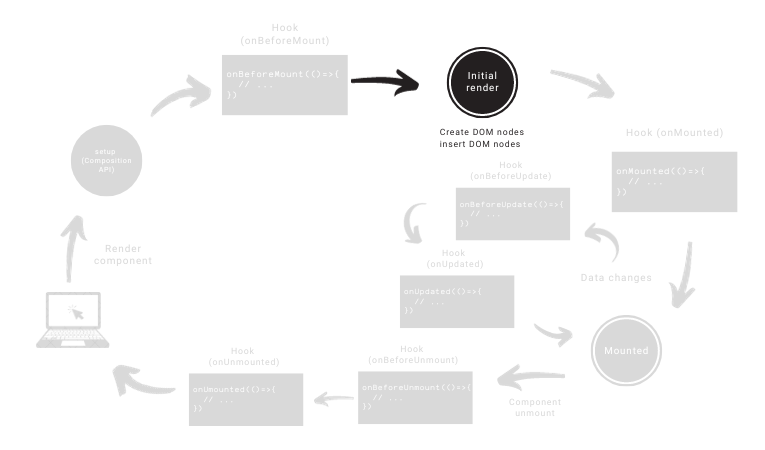
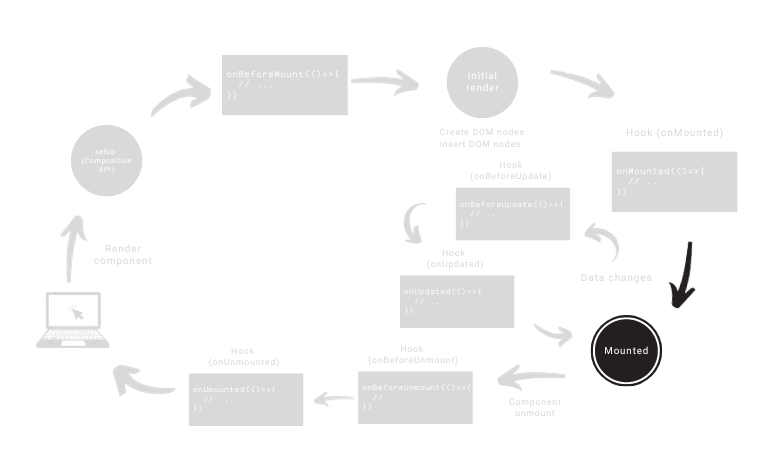
onMounted()After the initial render, the onMounted hook is called in Vue. This lifecycle hook is part of the Composition API, and its primary purpose is to execute logic or tasks after a component has been mounted into the DOM.
onMounted(() => {
  // Logic to execute when the component is mounted
});
The onMounted hook is particularly useful for tasks that require access to the DOM, as it ensures that the component has been fully rendered and inserted into the document.
onMounted hook include:By placing your code tasks into the onMounted hook, you make sure they get done right when they should be in the component’s life. It’s like making sure you take out the trash before the garbage truck arrives—it keeps things neat and efficient in your Vue app.
After that, the component is finally mounted.
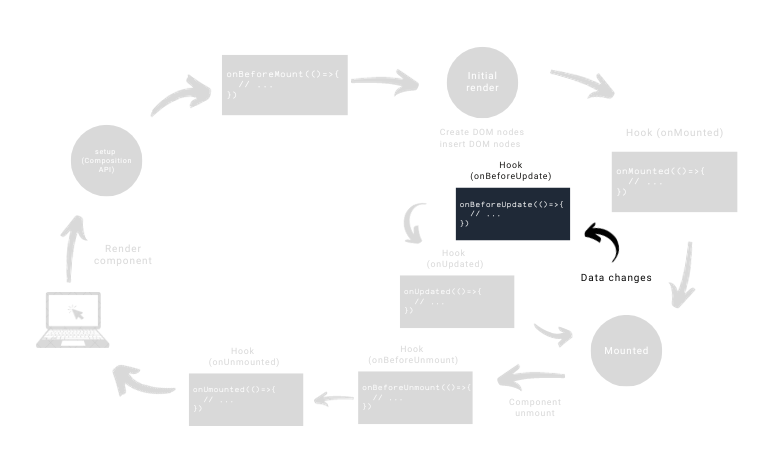
The onBeforeUpdate hook provides a moment in the component’s lifecycle just before changes are applied to the DOM. It is beneficial when you need to perform tasks or checks that should happen right before a component re-renders. This hook is particularly useful for scenarios where you want to clean up or prepare the component before an update.
onBeforeUpdate(() => {
  // Logic to execute before the component updates
});
onBeforeUpdate hook include:Keep in mind that whatever tweaks you make to the reactive state in the onBeforeUpdate hook won’t kick off an extra round of re-rendering.
In Vue 3, a “reactive state” refers to the ability of certain variables to automatically trigger updates in the user interface whenever their values change. The reactivity system in Vue ensures that the view is always in sync with the underlying data. When you declare a variable in the setup function using the Composition API, Vue makes it reactive, meaning any changes to that variable will be efficiently tracked, and the necessary updates will be applied to the DOM.
So if you’re looking to reactively respond to state changes, your go-to buddies would be the watch function or other reactive tools instead.
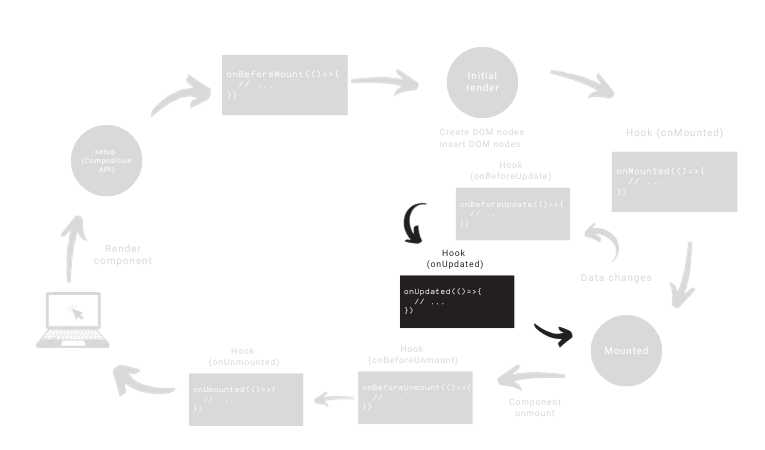
onUpdatedThe onUpdated hook is called immediately after a component and its child components have been updated in the DOM. It’s useful when you need to execute logic that depends on the updated state of the component or when you want to perform actions after the component has re-rendered.
onUpdated(() => {
  // Logic to execute when the component is updated
});
onUpdated hook include:onUpdated comes in handy. You can kick off an API call or grab new information right when the component changes.onUpdated is perfect for adjusting the UI based on the latest state. It’s like giving your component a quick mirror check before it goes out.onUpdated is the moment to sync everything up. Whether it’s handling new messages, updates from other components, or whatever else, onUpdated is your go-to time slot.onBeforeUnmountIn Vue 3, the onBeforeUnmount hook is a part of the Composition API and plays a crucial role just before a component is about to be unmounted or destroyed. This hook provides a space for you to perform any cleanup tasks or finalizations right before Vue removes the component from the DOM.
onBeforeUnmount(() => {
  // Logic to execute before the component unmounts
});
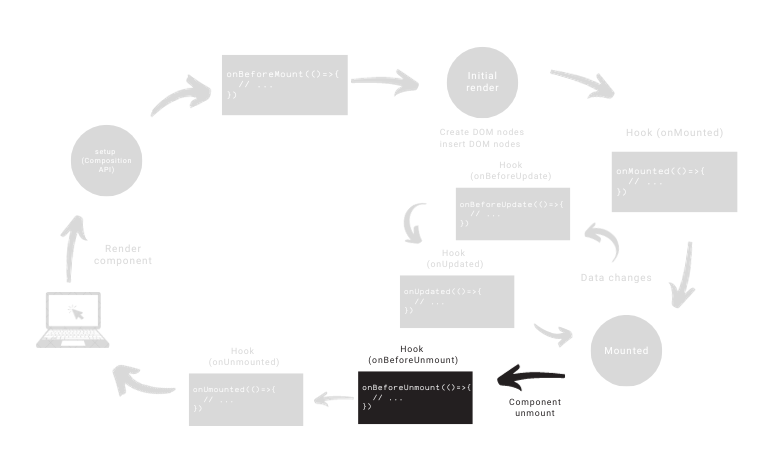
onBeforeUnmount hook include:By utilizing onBeforeUnmount, you ensure that your component has a chance to tidy up and release resources before it bids farewell. It contributes to maintaining a clean and efficient Vue application by handling necessary cleanup tasks at the right time in the component’s lifecycle.
onUnmountedIn Vue 3, the onUnmounted hook, part of the Composition API, allows you to set up logic that kicks in after a component has finished its job and is about to be removed. It’s a practical tool for handling cleanup duties and releasing resources, contributing to a smoother and more efficient component lifecycle.
onUnmounted(() => {
  // Logic to execute when the component unmounts
});
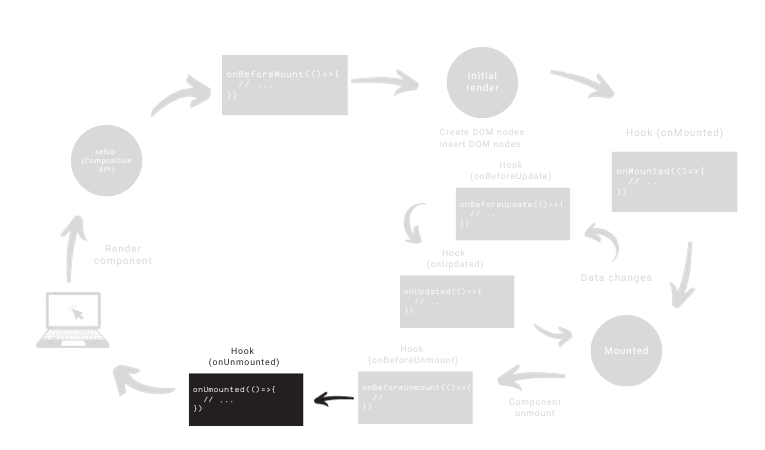
onUnmounted hook include:By making use of onUnmounted, you guarantee that your component undergoes a proper cleanup, releasing resources efficiently before being removed from the application. This practice significantly enhances the overall health and efficiency of your Vue application.
Alright, that’s a wrap on our Vue 3 lifecycle journey! Understanding how components come to life, change, and eventually say their goodbyes is key to unleashing Vue’s full potential. Those nifty hooks, like onBeforeUpdate and onUnmounted, act as your trusty sidekicks throughout this adventure.
And let’s not forget the setup function—it’s like the cool magician behind the scenes, combining all your component’s moves into one slick block. This not only keeps your code looking sharp but also ensures your Vue app stays snappy and responsive.
So, as you continue tinkering with Vue and its Composition API, keep these hooks in your toolkit. They’re your secret sauce for creating web magic that users will love. Happy coding, and may your Vue journey be smooth and glitch-free!
Leave a Reply