This introduction is designed for software developers who want to learn the basics of Node.js and its architecture. This tutorial will give you a sufficient understanding of all the necessary components of Node.js.
Node.js is a free, open-source, cross-platform environment that runs JavaScript code outside a web browser. With it, we can build web applications in general, from web sites to APIs and microservices.
This is possible thanks to the combination of three main components:

Node js applications are written in JavaScript and can run within the Node js runtime on OS X, Microsoft Windows, and Linux.
A runtime environment is the environment provided to an application or software by the operating system. In a runtime environment, the application can send instructions or commands to the processor and access other system resources, such as RAM, which is otherwise not possible because most programming languages used are high-level languages.
The runtime environment provides a state so that the machine used has access to resources such as software libraries, system variables, and environment variables, and provides all the services and support needed for the processes involved in running the application or program.
A JavaScript engine is a program or an interpreter that runs the JavaScript code. A JavaScript engine can be implemented as a standard interpreter, or a just-in-time compiler that compiles JavaScript for bytecode in some way.
Every major browser has its own engine. You can see the complete list in this link. We’ll cite a couple of then:
The engine we’re really interested in here is the V8, it’s the one behind the Node js. It was initially designed to increase the performance of running JavaScript inside the browser.
In order to increase speed, V8 translates JavaScript code into machine code (more efficient) instead of using an interpreter. It compiles JavaScript code into machine code on-the-fly, implementing a JIT (Just-In-Time) compiler like many modern JavaScript engines do, such as SpiderMonkey (Mozilla). The main difference here is that V8 does not produce bytecode or any intermediate code.
As the creators themselves call it:
libuv is a multi-platform support library with asynchronous I/O focus. It was developed mainly for use by Node.js.
Libuv Github
It is a library written in C that is used to abstract non-blocking I/O operations for a consistent interface on all supported platforms. In addition, the library has several other features such as:
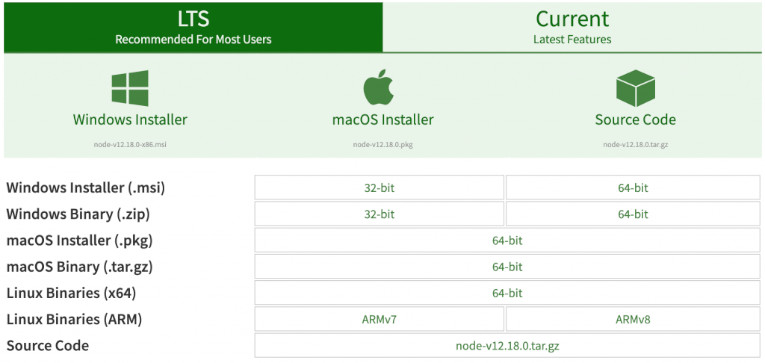
To start building your Node.js applications, the first step is installation. The framework is available for a variety of operating systems, from Windows to Ubuntu and OS X.
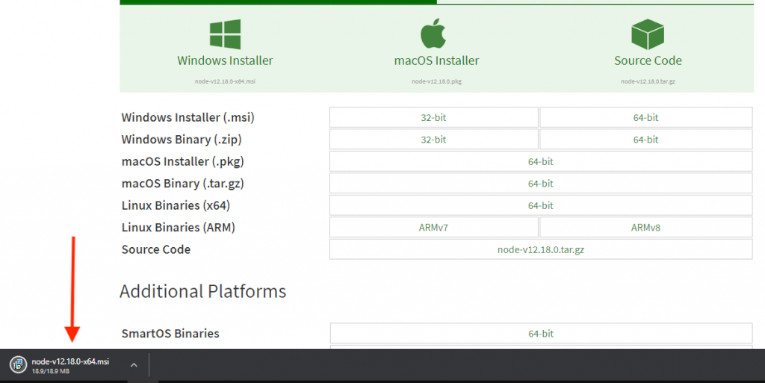
Go to https://nodejs.org/en/download/ and download the necessary files for your operating system. In this example, we will download the 64-bit configuration files for Windows.
After finishing the download we go to the step for installation. Just click on the icon below, and the installation process will begin.
The installation is quite simple, not many details. The first screen you will see will be this one below, to proceed just click the “Next” button.

On the second screen, you must accept the license terms of use to proceed with the installation.

You can set a different location for Node js installation if required. If it is not necessary to change the installation location of Node js you can forward this step.

The installation of Node js comes with some other very important packages, like npm(Javascript package manager). If for some reason you do not need any of these packages, you can simply remove them from the Node js installation. Otherwise, leave everything as it is and move on to the next step.

Some npm modules need to be compiled from C/C++ during installation. If you want to be able to install such modules, some tools (Python and Visual Studio Build Tools) need to be installed.
For our tutorial, these tools will not be necessary. We can move on.

If all your settings for Node js installation are correct, just click “Install”.
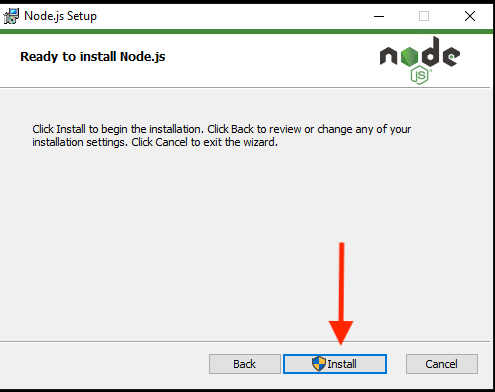
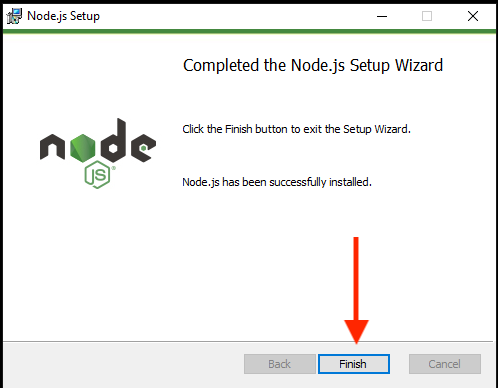
Now just wait for the Node js installation to be completed.

And that’s it, Node js is ready to be executed.
Before starting some code examples, it is important to have an idea about the architecture of Node js. In this session we will discuss how Node Js works from the inside. How Node js handles simultaneous requests following a Single-Thread model.
Maybe some people are not familiar with some of the nomenclatures, and because it is very important to understand the basic structure of Node js, we will review some main points.
A process is a running program, that is, a program running and is created when a program starts running. A process can have several threads.
In computer science, a thread is a small set of instructions designed to be programmed and executed by the CPU, regardless of the parent process and is usually a part of the operating system.
The main difference is that threads within the same process are executed in a shared memory space, while processes are executed in separate memory spaces.
Single thread processes execute all instructions in a single sequence. In other words, only one command is processed at a time.
The opposite of single-thread processes are multi-thread processes. These processes allow the execution of multiple parts of a program at the same time.

A Node js application runs on a single thread and the event loop also runs on the same thread. So, we can say that Node js is single-threaded, but there are some libraries in Node js that are not single-threaded.
That’s where the libuv library comes in. It is responsible for dealing with tasks related to the operating system, such as asynchronous I/O-based tasks of operating systems, networks, concurrency, etc.
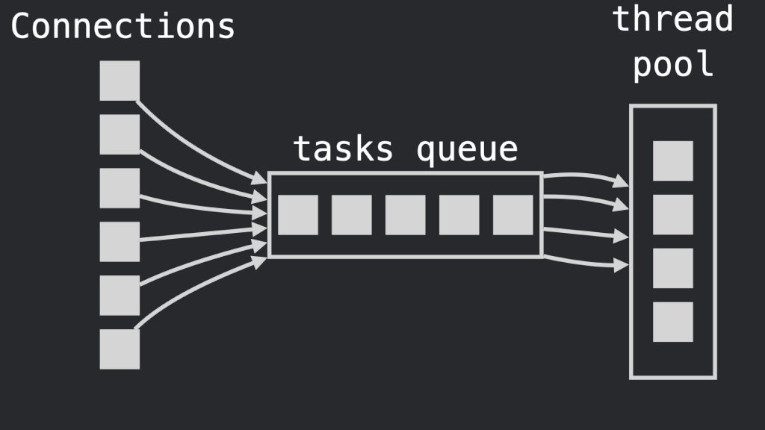
When Node requests simultaneous process execution, the Libuv library configures a set of four threads to perform the operations, using the power of all CPU cores. Since our machine has four cores, each thread in the pool is assigned to each core.
This results in one thread per core. With this setting, all four threads will run their process on each core in parallel.
If you want to understand more, visit this article, which explains in even more detail.
Node.js is an event-based platform. This means that everything that happens on Node is the reaction to an event. A transaction passing through Node passes through a cascade of callbacks.
Independently of the developer, all this is handled by the libuv library which provides a mechanism called an event loop.
As I mentioned before, there is only one thread that runs the JavaScript code and that is where the event loop is running. The execution of callbacks (know that every code executed by the user in a running Node.js application is a callback) is done by the event loop.
Libuv by default creates a pool with four threads to unload asynchronous work. But current operating systems already provide asynchronous interfaces for many I/O tasks.
Whenever possible, libuv will use these asynchronous interfaces, avoiding the use of the thread pool. The same applies to third-party subsystems, such as databases.
In short: Only if there is no other way, the thread pool will be used for asynchronous I/O.
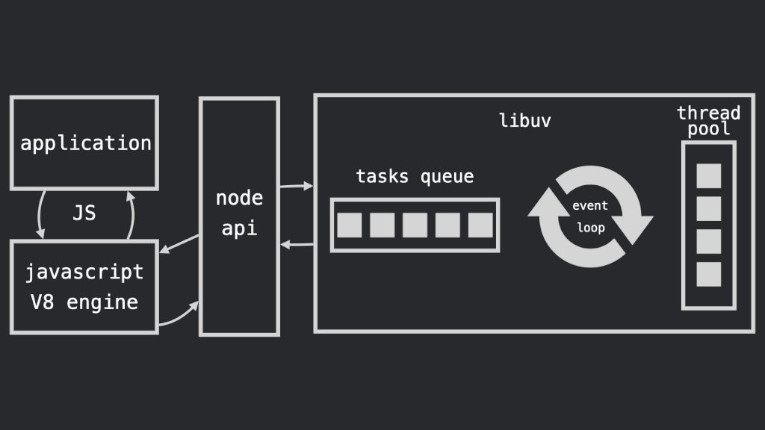
In a simplified way, the node js system works like this. On the one hand, we have your application sending requests to your server in node js, the V8 engine then translates the JavaScript code into machine code, API of the node js communicates with the libuv library that runs the I/O processes of the operating system using a loop of events, if necessary, making use of the thread pool.
Modules in Node.js are a simple or complex functionality organized in one or several JavaScript files that can be reused throughout the Node.js application.

Node.js includes three types of modules:
Each module in Node.js has its own context, so they cannot interfere with other modules or pollute the global scope. In addition, each module can be placed in a separate javascript file in a separate folder.
Node.js implements the CommonJS module standard. CommonJS is a group of volunteers who set JavaScript standards for web servers, desktop, and applications.
What we will do now is create a small application using Node js, which will turn your computer into a server.
Once you have downloaded and installed Node.js on your computer, we will try to display some messages in your browser.
The first step is to create a main file, which we will call app.js. Enter the code below in the document:
const http = require('http');

const hostname = '127.0.0.1';
const port = 3000;

const server = http.createServer((req, res) => {
  res.statusCode = 200;
  res.setHeader('Content-Type', 'text/plain');
  res.end('Debug Everything');
});

server.listen(port, hostname, () => {
  console.log(`Server running at http://${hostname}:${port}/`);
});
Save the file to some easily accessible folder. After that, you need to open a window in your terminal, navigate to the folder where you saved your file and run the node app.js command, you will probably see a message like this on your terminal indicating that your application is running on the :3000 port.
$ node app.js
Server running at http://127.0.0.1:3000/
Now, your computer works like as a server!
If someone tries to access your computer on the route http://localhost:3000, they will receive the message “Debug Everything”.

Node.js has an embedded module called HTTP, which allows Node.js to transfer data via the Hyper Text Transfer Protocol (HTTP).
We are including the HTTP module, using the require() method, in the first line.
const http = require('http');
Here we are defining the hostname and the port the server will run on:
const hostname = '127.0.0.1';
const port = 3000;
The HTTP module can create an HTTP server that listens to the server ports and gives a response to the client. We can then use the createServer() method to create an HTTP server.
The function passed to the http.createServer() method will be executed when someone tries to access the computer on port 3000.
const server = http.createServer((req, res) => {
  res.statusCode = 200;
  res.setHeader('Content-Type', 'text/plain');
  res.end('Debug Everything');
});
And on the last line, we’re using the listen() method to start listening to port 3000 in that hostname.
server.listen(port, hostname, () => {
  console.log(`Server running at http://${hostname}:${port}/`);
});
The intention of the post was to introduce you to the basic structure of Node js, and how it works from the inside.
Existem muitos assuntos que podem ser abordados quando falamos de Node js existe todo um ecosistema de módulos como o Express e AdonisJS que expandem ainda mais a capacidade do Node js, mas vamos deixar isso para futuros posts.
There are many topics that can be addressed when talking about Node js there is a whole ecosystem of modules like Express and AdonisJS that expand the capacity of Node js, but let’s leave that for future posts.
I hope the content was useful. Leave us your questions and suggestions for the next post!
See you next time!
Fantastic article! Gets me excited to use Node.js!
Leave a Reply