But one step of our project, after creating the whole page structure with CSS and HTML in part 1 and adding Javascript to send the data to the server in part 2. The time has come to talk on the server side. And this time our login page with Python.
In part 2, I created an example of a PHP file to represent our server. But due to popular acclaim, we’re going to make the change now, and we’ll create our login page with python.
For those who have never had contact with language, it may not be the right way to start. In this article I won’t show you how to install Python or how to get started in the language, I’ll just quote some of the tools and procedures.
Most projects, if not all, have dependencies, either in a library, framework or API. For this, each programming language has its own dependency management tools.
How does Python solve that problem? By creating virtual environments.
Virtual environments are independent groups of Python libraries. Packages installed for one project will not affect other projects or operating system packages.
Python 3 comes together with the venv module to create virtual environments. If you’re using Python 2, you might want to take a look on How to create Virtual Environments with Python virtualenv.
You can check the version using the python --version command in the terminal.
Flask is a micro web framework written in Python. It is classified as a microframework because it does not require specific tools or libraries.
And this miserable is very easy to use!
If everything is ok with Python on your computer, you just need to use the pip install flask command to install the latest version of Flask.
This code below you’ll find almost anywhere when you Google Flask. And it demonstrates how simple it is to create and run an application.
Open your text editor and put this code below and save the file as main.py.
from flask import Flask
app = Flask(__name__)

@app.route("/")
def hello():
    return "Hello World!"
if __name__ == "__main__":
    app.run()
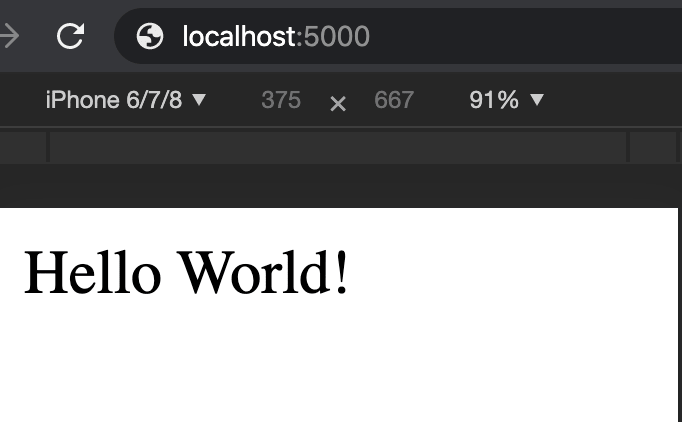
Once you have done this, open a window in your terminal in the folder where you saved your file and type the python main.py command and press enter
Yes that’s all, and you already have an application running on the localhost:5000 port, which is the default port Flask uses.
If you open your browser on this route you will see a result possibly similar to this one:
To avoid that hassle of rebooting the server every time you make a change to the login page file using Python, you can do the following:
app.run() to app.run(debug=True)Now every time you change and save the server is restarted automatically.
To use our Flask microframework on our login page with python we will need to make some small changes to our HTML and folder structure.
The CSS and Javascript files we created in the first part still remain the same ????. But the way to include them changes a bit.
Now, we will include the files using this template:
{{ url_for('static', filename='css/style.css') }}{{ url_for('static', filename='js/script.js') }}
Now our code will stay that way:
<!-- Including CSS file-->
<link rel="stylesheet" href="{{ url_for('static', filename='css/style.css') }}">

<!-- Including Javascript file-->
<script src="{{ url_for('static', filename='js/script.js') }}"></script>
A little too much code, but it’s not the end of the world either. The url_for() function generates us a URL for the final route given a parameter.
Flask asks us (kindly) to create two folders a 'static‘ folder call where we will put our CSS and Javascript files. And a second folder called 'templates', where our HTML files goes.
By the way, static in that code up there, it references that folder we’re just creating.
To separate even better, inside the static folder I created a folder for each file type, the final structure of the folders looks like this:
/static
---css
---javascript
/templates
---login.html
main.py
We’ve already made all the necessary adjustments to leave for Python. I’ll use that code we saw up there in the first example, and we’ll give it an increment.
from flask import Flask, render_template, request
app = Flask(__name__)

@app.route("/login")
def screen():
    return render_template('login.html')

if __name__ == "__main__":
    app.run(debug=True)
What’s changed?
Well, in the first line, besides Flask, I’m also importing the request Object, which comes by default with Flask, and the render_template function.
request is the Object used to make and also receive HTTP requests. I look at this object and we’ll use it further on.
render_template to render our HTML, I had to import this function that comes with the Flask structure called render_template().
The render_template() function invokes the Jinja2 template engine that comes with the Flask framework (remember what I said about dependencies).
I also changed the main route name to "/login" and the function name to screen(). And instead of returning just a String I’m returning our HTML file, login.html.
If all went well so far, when you run your Python main.py file and access the localhost:5000/login route you should see your login page only using python this time.
Right, the time has come then to send the data we received on the form to our newly created server.
Remember our Javascript file, the same as part 2. We need to make a slight change. I know I said we wouldn’t touch that file. But in part 2 we used PHP, but now, we are creating our login page with python, so we need to remove that url and pass the new route.
We need to change a line.
Before:xml.open("POST", "login.php");After:xml.open("POST", "/login");
Now our Javascript file is ready to send the data to our server. But remember I told you that that route does not accept POST. We need to figure this out.
To make the code more readable, I created a second route, with the same name, but which accepts the POST request.
Just put this second parameter methods = ['POST'] in the @app.route() function.
@app.route('/login',methods = ['POST'])
def login():
   if request.method == 'POST':
      email = request.form['email']
      password = request.form['password']
      return "Email: " + email + " <br> " + "Password: " + password
On this route I am using our Object request. With it I can access the data coming from the request on the customer side.
To access the data, just like in PHP we’ll use the field name we defined in our form in part 1.
Our final main.py file will look like this:
from flask import Flask, render_template, request
app = Flask(__name__)

@app.route("/login")
def screen():
    return render_template('login.html')

@app.route('/login',methods = ['POST'])
def login():
   if request.method == 'POST':
      email = request.form['email']
      password = request.form['password']
      return "Email: " + email + " <br> " + "Password: " + password


if __name__ == "__main__":
    app.run(debug=True)
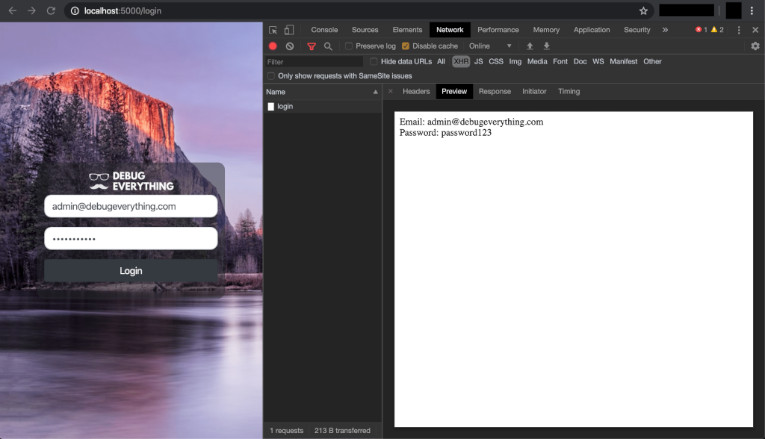
The time has come to test. Our main.py file is just returning the data it receives, just like I did in the example in part 2.
The end result must also be very similar. Only now using Python.
So that’s it, the end of another part of the series of how to build a login page with python. And now it’s more than official. Python will also be used in our tutorials from now on.
If you like this news, and want to be notified when you have new content, just sign up to receive the notifications in the form below.
See you in next time!
Leave a Reply