In the first part of how to create a login page from scratch, we defined all the elements and create the whole page structure.
If you haven’t seen the first part, come back and check it out so you don’t get lost here.
If you want to follow up and be notified, click here and sign up to receive the notifications.
Cool, we already have our login page, very simple until then, only 5 elements. And this was the final result.
Well what’s missing from our page then? Action!
It has no function so far, it’s a static page. In this second part we will start working with Javascript.
The idea here is to create a function called:
userLogin() – This function will receive and send the form data to the server.Before we do that, we need to make some minor changes to the code.
To receive the data from our page we need to include a few more things in our HTML form.
The first one is to define an id for our form, so javascript can easily find the form. We can do this quite simply, within our tag <form> we add id="login-form".
Second, we need to put a click action on the login button. Inside the tag <button> we’ll include a new attribute to specify that action.
The attribute with the name of the function (the action we want to perform) already assigned looks like this, onclick="userLogin()", very simple too. Our form code will look like this after these small inserts.
This is the function that will receive your data as soon as you click the login button.
There are several ways to do this, here I decided to use vanilla Javascript to simplify. What I’m doing is searching our form in our login page by the id we defined above, using the document.getElementById() function for that.
let userLogin = function () {
    let form = document.getElementById("login-form");
    let email = form.elements.namedItem("email").value;
    let password = form.elements.namedItem("password").value;
};
With our form in hands, we now need to search our email and password fields. Javascript also offers a quick way to do this, searching the field by the name="" atribute, which was also defined in the previous steps.
We already have all the information we need, now we only need send to our server through an HTTP request.
For this we will use the Api XMLHttpRequest, which despite the name, we can use to get any kind of data, not only XML.
That’s the code I’ll use to send the data to the server. Don’t worry, I’ll clean it up, and explain what’s going on here.
let userLogin = function () {
    let form = document.getElementById("login-form");
    let email = form.elements.namedItem("email").value;
    let password = form.elements.namedItem("password").value;
    let credentials = "email=" + email + "&password=" + password;
    const xml = new XMLHttpRequest();

    xml.onreadystatechange = function () {
        if (xml.status == 200) {
            console.log(xml.response);
        }
    };

    xml.open("POST", "login.php");
    xml.setRequestHeader("Content-type", "application/x-www-form-urlencoded");
    xml.send(credentials);
};
XMLHttpRequest() is the builder of the API. It must be called before any other API method.
xml.onreadystatechange this property contains the event manager to be called when the readystatechange event is triggered, i.e. whenever the XMLHttpRequest readyState property changes.
xml.status is the property that returns the HTTP code of the call response.
xml.response this property returns the body content of the response from the server in different formats, depending on the responseType.
xml.open() the method initialises a request, or resets an existing request.
xml.setRequestHeader() sets the header value of an HTTP request.
xml.send() this is the method that sends the request to the server.
In the xml.open() function, I defined two parameters, the first one defines the type of request, in this case, as we want to send data to the server, I’m using the POST method. The second parameter represents the url to which we will send the request.
It also includes two parameters in the function, xml.setRequestHeader(). The first parameter creates a header for the request that defines the content type sent in the request, and the second identifies what type of content this is.
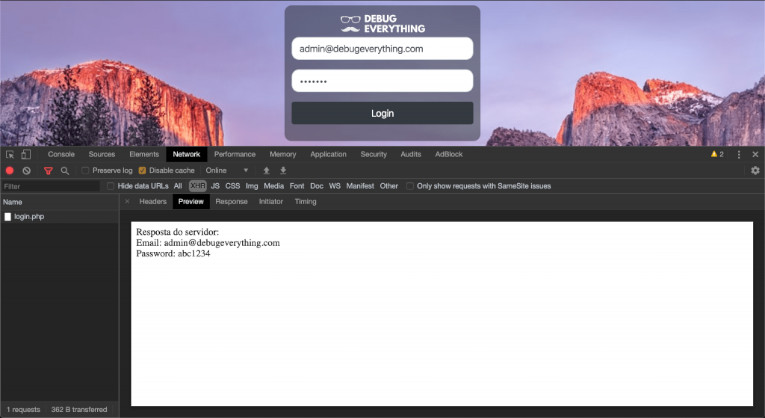
To test the function, I created a PHP file to receive this data inside localhost. As you can see in the code below, very simple, just for testing.
<?php
echo 'Server response:';
echo '<br>';
echo 'Email: ' . ($_POST["email"]);
echo '<br>';
echo 'Password: ' . ($_POST["password"]);
As soon as the user clicks the login button, the server responds with the data that was sent.
That’s all for now, I invite you to be part of the collaborative project, where you can put your ideas and practice what you have learned. Just click here to contribute to the project.
The project is not finished yet, the next step we’ll connect with the database. And we can also make a change to JAVA.
Leave in the comments what you want to see in the next content of the series.
And be sure to subscribe to the newsletter using the form below, and be notified as soon I release a new content.
where do we put the "let userLogin = function () { let form = document.getElementById("login-form"); let email = form.elements.namedItem("email").value; let password = form.elements.namedItem("password").value; let credentials = "email=" + email + "&password=" + password; const xml = new XMLHttpRequest(); xml.onreadystatechange = function () { if (xml.status == 200) { console.log(xml.response); } }; xml.open("POST", "login.php"); xml.setRequestHeader("Content-type", "application/x-www-form-urlencoded"); xml.send(credentials); };
Hi ClapzDestiny, (hope that's not your real name, haha) Thanks for your question in my blog. I just figured out that i forgot to describe where to put the JS code. Thanks for that by the way. But, what you can do it's simple, at the end of your
tag but before the closing you will write inside the SCRIPT tag:
let userLogin = function () {
   let form = document.getElementById("login-form");
   let email = form.elements.namedItem("email").value;
   let password = form.elements.namedItem("password").value;
   let credentials = "email=" + email + "&password=" + password;
   const xml = new XMLHttpRequest();

   xml.onreadystatechange = function () {
      if (xml.status == 200) {
         console.log(xml.response);
      }
   };

   xml.open("POST", "login.php");
   xml.setRequestHeader("Content-type", "application/x-www-form-urlencoded");
   xml.send(credentials);
};
This will create the function that your button will call to send the login credentials to the server.
If you have any more questions, just let me know.
I'll updated the post as well, ASAP.
Yeah! Wow! It Worked!!! Thank you so much!!!! =D
Idea: Use Variables and save the variable value (but the info isn't storing user data, it've only library data.) and use ID as username and get the id and set its innerHTML To the username and same for password.
Leave a Reply