React is a front-end JavaScript library that can be used to create interactive user interfaces for your application. In this tutorial, we will create a “ToDo List” application that covers all four aspects of a CRUD: Create, Read, Update, and Delete.
This type of project is often done with Class components, but this application will integrate React Hooks. Hooks allow functional components to have a state and use life-cycle methods, allowing you to avoid using Class components and have more modular and readable code.
Without further ado, Let’s get started!
To install React, we need npm which is a package manager for JavaScript.
npm is installed together with Node.js. This means you have to install Node.js to get the npm installed on your computer.
Download Node.js from the official website: https://nodejs.org
Let’s run the create-react-app command inside the terminal, in the folder where you want to create your project, followed by the name of our project, which will be for us, react-to-do, the command will look like this:
$ npx create-react-app react-to-do
npx is a tool to run npm packages that live inside the local node_modules folder or are not installed globally, this tool already comes in Node.js installation.
And the create-react-app command installs the necessary dependencies to build our React project and generates the initial structure that we will see next.
Once the installation is finished, we will test the application, just run these two commands on the same terminal:
$ cd react-to-do
$ npm run start
With the first command, you will enter the folder that the create-react-app command created, if you changed the name of the project, you need to change it here too.
The second command runs a Node.js service to host your application. It will host your application on a local service on route http://localhost:3000/.
The browser should open automatically and you will see something like this:

If your browser does not open directly, you can type localhost:3000 in your browser to open your application, this symbol will probably be spinning.
With your application running, let’s start on the reading part of the CRUD. We’ll make a list of things for you to read/view.
But before that, we will remove all unnecessary code from our src/App.js, your file should look like this:
import React from 'react';
import './App.css';

function App() {
  return (
    <div className="App">

    </div>
  );
}

export default App;
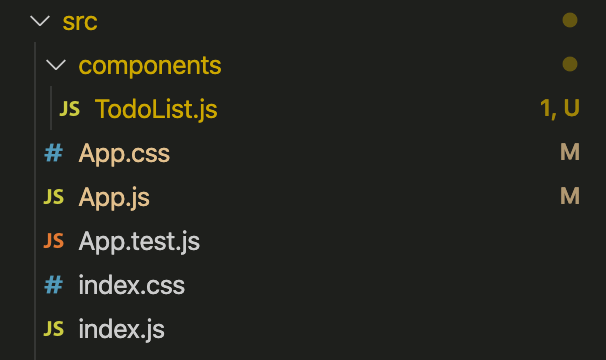
Now let’s create a new folder called components and inside this folder create a file with the name TodoList.js.
This component will be responsible for displaying the list of items on our screen.
In our component declaration we will include two parameters: todos and updateTodos.
function TodoList({ todos, updateTodos }) {
...
}
At this point, we will pay attention only to the first parameter, todos. The second parameter we’ll treat further ahead.
This parameter is the list with all the items on our list. We will receive the list of the main component, always updated, to display for you.
So with a few lines, we’ve already managed to show our list, the main part of our component looks like this:
<div className="todo-list">
  {todos.map((todo, index) => (
    <div
      key={index}
      className="todo">
      Item {index + 1}: {todo.task}
    </div>
  ))}
</div>
Notice that all the code is inside a <div>, which contains a property, className="todo-list". This property inserts a new CSS class in this component, in the case of the CSS todo-list class, which I’ll show later.
Also, notice that, React uses className="" and not just class="" as we normally do with HTML, the reason behind this is that React uses JSX, I will create a dedicated post to explain more about JSX.
But for now, understand that it’s just a way of writing HTML into Javascript files.
So once the component receives the list, what we need to do is just iterate over the list and display it to the user. I am doing this using Javascript’s Array.map() method.
todos.map((todo, index) => (
  ...
))
To display the tasks, I used another <div>, inside Array.map(), with two very important properties.
One of them, className="all", I already commented before, will apply a CSS class to our element.
The second key={index} property helps React identify which items have been changed, added, or removed.
A key attribute must be included in your array, but in this case, as the items in our list have no ids, for example, we will use the index referring to their position in the array.
In the last line, as you can imagine, is where we display all the items on the list, along with a counter.
<div
  key={index}
  className="todo">
  Item {index + 1}: {todo.task}
</div>
The complete code of the TodoList component of our React App will look like this so far:
//TodoList
import React from 'react';

function TodoList({ todos, updateTodos }) {
  return (
    <div className="todo-list">
      {todos.map((todo, index) => (
        <div
          key={index}
          className="todo">
          Item {index + 1}: {todo.task}
        </div>
      ))}
    </div>
  );
};

export default TodoList;
Before displaying our list, I will create the CSS classes I have commented on, so our list will be more presentable. That’s why I didn’t remove the ./App.css call from our App.js, you will put the code there.
/* App.css */
.App {
  background: #27292d;
  padding: 30px;
  height: 100vh;
}

.todo-list {
  margin: auto;
  background: rgb(112, 111, 111);
  border-radius: 4px;
  padding: 5px;
  max-width: 400px;
}

.todo {
  background: #fff;
  box-shadow: 1px 1px 1px rgba(0, 0, 0, 0.15);
  padding: 10px 10px;
  font-size: 20px;
  border-radius: 3px;
  display: flex;
  align-items: center;
  justify-content: space-between;
  cursor: pointer;
}
The layout here is not the focus of our project, so I’ll skip the explanations.
Back to our App.js, we’re going to use React Hooks, so the state will look a little different than if we used classes.
First of all, we need to import our Hook useState from the React library, like this:
import React, { useState } from 'react';
Now we can create our first state using Hooks, it’ll look like this:
const [todos, setTodos] = useState();
React Hooks are a new addition to React 16.8. They allow you to use state and other features without needing a class. Let’s break down our new state.
todos, is the name of our state.setTodos, is what we’ll use to set the state.The useState() hook is what React uses to connect to the component state or life cycle. We can also, initialize our state with an initial value.
Our initial state consists of an array of objects. Where we will define 3 tasks, following this format:
[
  { complete: false, task: "Read about MongoDb" },
  { complete: false, task: "Create a React ToDo App" },
  { complete: false, task: "Find my key" }
]
The first attribute completewill indicate whether the task has already been completed or not. The second attribute taskis the task description.
Therefore, every new task will be inserted in the existing list. In the “real world”, this list would probably come from a database.
Our state, will look like this at the end.
const [todos, setTodos] = useState([
  { complete: false, task: "Read about MongoDb" },
  { complete: false, task: "Create a React ToDo App" },
  { complete: false, task: "Find my key" }
]);
Finally, we need to import and declare our new component, TodoList, within our App.js.
import TodoList from './components/TodoForm';
And we also need to pass to it, the initial task list through the property todos, which we defined in our TodoList component.
<TodoList todos={todos}></TodoList>
O código completo do componente App do nosso React App, ficou assim até agora:
The complete code of our React App component will look like this:
import React from 'react';
import './App.css';
import TodoList from './components/TodoForm';

function App() {
    const [todos, setTodos] = useState([
        { complete: false, task: "Read about MongoDb" },
        { complete: false, task: "Create a React ToDo App" },
        { complete: false, task: "Find my key" }
      ]);
  return (
    <div className="App">
      <TodoList todos={todos}></TodoList>
    </div>
  );
}

export default App;
Your todo app must be looking like this right now:

Now, let’s give our application the power to create a new item for our list.
Let’s create one more component.
In the same folder as the TodoList, create a component called TodoForm, this will be the component responsible for creating and submitting new items to the list.
In this component, we will define a second state, which will receive your input from the form. In this state, we’ll start by passing an empty string only, (this will make sense later).
const [userInput, setUserInput] = useState("");
As well as variables and constants, we can also send functions between components. And that’s exactly what we’re doing here.
...
function TodoForm({ addTodo }) {
...
}
The addTodo parameter is actually a function. The addTodo() function is not declared in the TodoForm component but received with one of the parameters during the component declaration.
With this method, we will send all the data we receive from the user to our main App.js component where our main state lives.
We can now create our form to receive the data. The declaration of the form receives two properties, the first onSubmit={handleSubmit} is where we call the function that will manipulate the user’s data.
The second, className="todo-form" is the inclusion of a CSS class in that element.
<form onSubmit={handleSubmit} className="todo-form">
And within our form, only one input, responsible for receiving data from the user.
<input
    placeholder="New Task"
    type="text"
    value={userInput}
    onChange={e => setUserInput(e.target.value)}
/>
We set the property value={userInput} to delete from the form, after submission, what the user wrote. If the value property is not present and receiving the state value, every time the user enters and submits a new task, the text will not be deleted from the input.
Our last property is the cherry of the cake. onChange is a default property of the tag <input />, what it does is quite simple, every time the input is modified (when the user types something, for example) the property triggers an event indicating that the component has been updated.
We will then use this event to update the current value of our state. Passing to our setUserInput() method the e.target.value which is the last value that the user typed.
Notice that I am using arrow function to receive the value of the event.
To receive the values from the user, we will create a function called handleSubmit, it is triggered as soon as the user presses enter to write a new task.
Na primeira linha temos que fazer e.preventDefault(), e é o evento que o formulário emite após ser submetido. E o comportamento padrão de uma formulário é recarregar a página, o que não é interessante para nós.
E se caso o valor for uma string vazia "" o código não faz nada. Pois uma string vazia é falsy.
In the first line, we have to do e.preventDefault(), e it’s the event that the form issues after being submitted. And the default behavior of a form is to reload the page, which is not interesting for us.
And if the value is an empty string "" the code does nothing. Because an empty string is falsy.
Notice that we are passing an object with two properties (which follows the pattern defined in App.js), to the method, addTodo({ complete: false, task: userInput }).
And finally, on the last line of the method, I pass an empty string to the state, to clear the input value, as I explained above.
const handleSubmit = e => {
    e.preventDefault();
    if (!userInput) return;
    addTodo({ complete: false, task: userInput, });
    setUserInput("");
};
The complete code of the TodoForm component of our Todo App looks like this so far:
//TodoForm.js
import React, { useState } from 'react';

function TodoForm({ addTodo }) {
    const [userInput, setUserInput] = useState("");

    const handleSubmit = e => {
        e.preventDefault();
        if (!userInput) return;
        addTodo({ complete: false, task: userInput, });
        setUserInput("");
    };

    return (
        <form onSubmit={handleSubmit} className="todo-form">
            <input
                placeholder="New Task"
                type="text"
                className="input"
                value={userInput}
                onChange={e => setUserInput(e.target.value)}
            />
        </form>
    );
};
export default TodoForm;
And this is the CSS class code, todo-form that I commented before, notice that I am also applying CSS to our input through the CSS selectors.
/*
App.css
*/
.todo-form{
  margin: auto;
  background: rgb(112, 111, 111);
  padding: 5px;
  max-width: 400px;
}

.todo-form input {
  width: 100%;
  padding: 5px;
  box-sizing: border-box;
  font-size: 18px;
}
Okay, now we need to import that component into App.js, just like we did with TodoList.
The idea is that the App.js serves as an intermediary between our form (TodoForm) and the display list (TodoList).
To make it clearer what we are going to do, I designed this outline of the project structure to facilitate understanding.
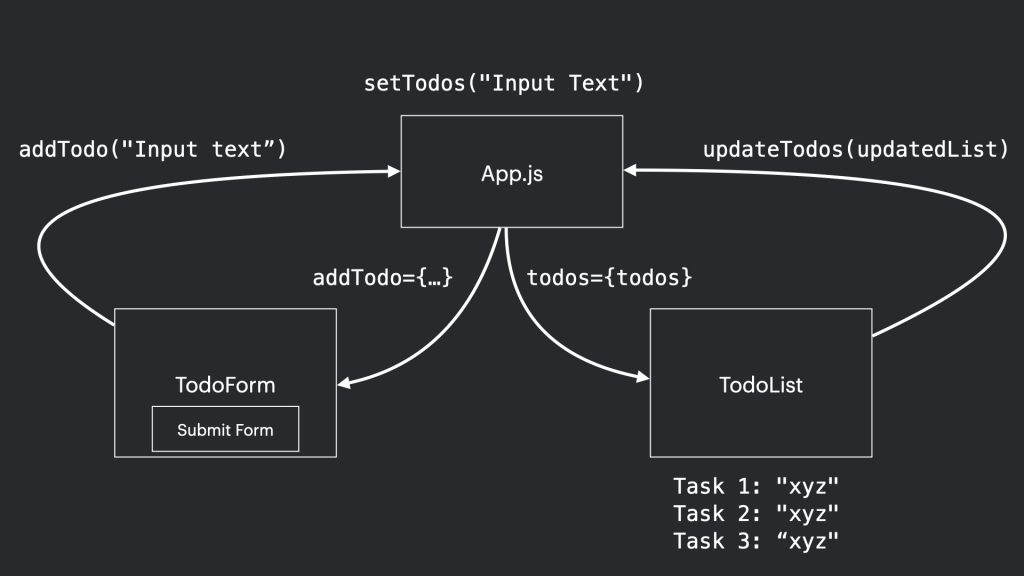
Using the addTodo parameter we create the connection between the two components TodoForm and App, as soon as the user presses Enter on the form, we receive the values in our App.js.
The addTodo parameter actually represents a function, which evaluates the data received from the TodoForm component and includes it in the existing task list.
The trim() method is just to remove possible whitespaces before and after a String.
(todo) => {
  if (todo.task.trim().length > 0) {
    setTodos([...todos, todo]);
  }
}
And for those who are not familiar with the spread operator… (the three dots). It is “expanding” the object we receive from TodoForm, within our task list. To make it clearer,look what’s happening with this example below:
const todo = [{complete: false, task: "New task"}]
const todos = [...todo,{complete: false, task: "Read about MongoDb"}];
console.log(todos);
/*[{complete: false, task: "New task"},{complete: false, task: "Read about MongoDb"}]*/
I’m just skipping these intermediate steps and entering all of them directly into the list todos using the setTodos from our state method.
This function we will pass to the TodoForm component through the addTodo parameter, this way:
<TodoForm addTodo={(todo) => {
  if (todo.task.trim().length > 0) {
    setTodos([...todos, todo]);
  }
}} />
The complete code of the App component of our Todo App looks like this at this point.
import React, { useState } from 'react';
import './App.css';
import TodoList from './components/TodoList';
import TodoForm from './components/TodoForm';

function App() {
  const [todos, setTodos] = useState([
    { complete: false, task: "Read about MongoDb" },
    { complete: false, task: "Create a React ToDo App" },
    { complete: false, task: "Find my key" }
  ]);
  return (
    <div className="App">
      <TodoForm addTodo={(todo) => {
        if (todo.task.trim().length > 0) {
          setTodos([...todos, todo]);
        }
      }} />
      <TodoList todos={todos} ></TodoList>
    </div>
  );
}

export default App;
And our React App should be working like this right now.

Okay, now let’s get back to work on our TodoList component. What we need now is a function that marks off the tasks already completed. The idea is to do something like this, when we click on the task, it is strikethrough, very simple.

What we need is a way to identify the item being clicked on and apply a CSS class that contains the effect we want.
To do that, we’ll create a function called markComplete.
const markComplete = (id) => {
    const updatedList = todos.map((item, index) => {
        if (id !== index) return item;
        return { ...item, complete: !(item.complete) };
    });
    uodateTodos(updatedList);
}
This function is very simple, it receives a parameter called id that will be the index referring to the position of that item in the array.
What the function will do is iterate over the list of items, using the Array.map() again, comparing the index and the id parameter that the function receives in order to update the complete property of the object that matches the two values.
As soon as the object is found, I just exchange the original value for the opposite of it. This is another great use of the Spread Operator, you can use it to update the values of an object, notice how it is being done in our function with this example:
const task = {complete: false, b: "Your task"};
const updatedTask = {...task, complete: true};
console.log(updatedTask);
// { complete: true, b: "Your task" }
One problem is that React does not recognise this “internal change” of attribute values, if you just change an attribute, of an object contained in the Array, this does not make React render the component.
Only when you remove, include, or change an element in the array, React will render the component again.
Tha’s why we are using Array.map(), because it creates a new array. And with that React is able to render our list.
E você se lembra do nosso segundo parâmetro updateTodos que passamos para o TodoList, logo no começo:
And you remember our second parameter updateTodos that we passed to the TodoList, right at the beginning:
function TodoList({ todos, updateTodos }) {
...
}
If you go back in the image where you have the schematic of the project, you will see that this method, updateTodos, is responsible for taking the data from the TodoList component to the App component.
So let’s go back to our App.js and change the line where the TodoList is called to include that parameter.
<TodoList todos={todos} updateTodos={(list) => { setTodos(list) }}></TodoList>
So as soon as the Array.map() method finishes creating the new array, already with the updated item values, I use the updateTodos method to send the updated list to our main component.
E com o método setTodos eu atualizo o nosso state com uma nova lista de items que formam marcados como concluídos/não concluídos.
And with the setTodos method I update our state with a new list, coming from the TodoList, with the items that are marked as completed/not completed.
Okay, what we need now is to use a method to recognise the click on one of the items on the list. The onClick method will serve us well. It will execute the markComplete() function.
<TodoList todos={todos} updateTodos={(list) => { setTodos(list) }}></TodoList>
This parameter index comes from the Array.map() that we are using to iterate and display the list items for the user.
And finally, we need to declare a condition on our className property, if the task is marked as done or complete:true we will apply the taskDone class, otherwise the class is removed.
className={`todo ${todo.complete ? "taskDone" : ""}`}
That’s the whole code of our componente:
//TodoList
import React from 'react';

function TodoList({ todos, updateTodos }) {

    const markComplete = (id) => {
        const updatedList = todos.map((item, index) => {
            if (id !== index) return item;
            return { ...item, complete: !(item.complete) };
        });
        updateTodos(updatedList);
    }
    return (
        <div className="todo-list">
            {todos.map((todo, index) => (
                <div
                    key={index}
                    className={`todo ${todo.complete ? "taskDone" : ""}`}
                    onClick={() => markComplete(index)}>
                    Item {index + 1}: {todo.task}
                </div>
            ))}
        </div>
    );
};

export default TodoList;
The CSS class we are applying is taskDone, so in our App.css file you must include it:
.taskDone{
  text-decoration: line-through;
}
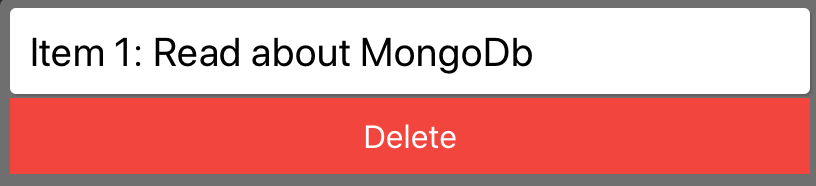
Our Todo List will be working like this so far:

Thinking that we can accidentally add a wrong task or that we have a task in the list that we don’t need to do anymore, or because it has already been completed and doesn’t need to be there anymore, we will create a function to remove those unwanted items.
In our TodoList component, we will include a button in each item to perform the delete action and also create the function to remove the item.
I’m going to add a function called removeTask() that will receive the task’s index in the list, and using the filter method, I’ll create a new list without the element we just removed to update the state with the updateAll() method we’re receiving from App.js. A process similar to the one we did in the markComplete() function.
const removeTask = (index) => {
    const updatedList = todos.filter((task, taskIndex) => {
        return taskIndex !== index;
    });
    updateTodos(updatedList);
}
And below each item, we will include our button. Our button has only two properties, className to add a CSS class and the onClick function that will trigger our removeTask() method.
Note that we are already passing the index to the method.
<pre class="hljs" style="display: block; overflow-x: auto; padding: 0.5em; background: rgb(240, 240, 240); color: rgb(68, 68, 68);"><span class="hljs-keyword" style="font-weight: 700;">const</span> removeTask = (index) => {
<span class="hljs-keyword" style="font-weight: 700;">const</span> updatedList = todos.filter((task, taskIndex) => {
<span class="hljs-keyword" style="font-weight: 700;">return</span> taskIndex !== index;
});
updateTodos(updatedList);
}</pre>
The complete code of our TodoList component will look like this:
//TodoList
import React from 'react';

function TodoList({ todos, updateTodos }) {

    const removeTask = (index) => {
        const updatedList = todos.filter((task, taskIndex) => {
            return taskIndex !== index;
        });
        updateTodos(updatedList);
    }

    const markComplete = (id) => {
        return todos.map((item, index) => {
            if (id !== index) return item;
            return { ...item, complete: !(item.complete) };
        });
    }
    return (

        <div className="todo-list">
            {todos.map((todo, index) => (
                <div key={index}>
                    <div
                        className={`todo ${todo.complete ? "taskDone" : ""}`}
                        onClick={() => setTodos(markComplete(index))}>
                        Item {index + 1}: {todo.task}
                    </div>
                    <div><button className="button" onClick={() => removeTask(index)}>Delete</button>  </div>

                </div>

            ))}
        </div>
    );
};

export default TodoList;
Let’s add the style of our button to our CSS file:
.button{
  background-color: #f44336; /* red */
  border: none;
  color: white;
  padding: 10px;
  text-align: center;
  text-decoration: none;
  display: inline-block;
  font-size: 16px;
  width: 100%;
  margin-bottom: 10px;
}
E é isso, nosso app está pronto Todo app está pronto!
And that’s it, our app is Todo App is ready!
Let’s test it:

This application uses React Hooks, which was introduced in version 16.8. It is a relatively new feature, but quite powerful and efficient. You can work the same way with Classes, but Hooks makes the code much cleaner and simpler to understand.
Creating an app that implements the basic CRUD functions is a great way to understand React life cycles.
I hope it was helpful.
See you next time.
WOW!!
Leave a Reply